1. Export root certificate.
a. Launch certmgr.msc
b. Locate root certificate in Trusted Root Certification Authorities\Certificates
c. Right-click the certificate in the results pane, click All Tasks, and then click Export. Complete the Certificate Export Wizard using the default settings.
2. To deploy root certificate using SCCM
a. Copy the Certutil.exe and Certadm.dll (installed in %windir%\system32) files to the same directory as the exported certificate.
b. Create a software distribution package containing the files (certutil.exe, certadm.dll, RootCert.cer).
c. Add a software distribution program that runs the following command-line
1st program: certutil.exe -addstore Root RootCert.cer
2nd program: certutil.exe -addstore TrustedPublisher RootCert.cer
(specify the first program to run before the second).
d. Create an advertisement for distributing the package and program to the appropriate collection.

Tuesday, May 17, 2011
Tuesday, March 22, 2011
JDBC and SQLExpress
Windows XP/ Server 2003
1. Download apache-tomcat-7.0.11 for Windows
2. Download MS SQL JDBC Driver 3.0
3. Download MS Web Platform Installer
4. Download Java SE 6 (JRE 1.6.24)
Installation:
Install MS SQL 2008 R2 Express Edition and SQL Management Studio using the Web Platform Installer.
Unzip apache-tomcat files to C:\apache-tomcat-7.0.11
Unzip SQL JDBC driver to C:\Program Files\Microsoft SQL Server JDBC Driver 3.0
Install Java SE 6
Set System Enviroment Variables:
Add JRE_HOME=C:\Program Files\Java\jre6
Add Path=C:\Program Files\Microsoft SQL Server JDBC Driver 3.0\sqljdbc_3.0\enu\auth
Verify CLASSPATH=.;C:\Program Files\Java\jre6\lib\ext\QTJava.zip
JDBC Driver:
Copy C:\Program Files\Microsoft SQL Server JDBC Driver 3.0\sqljdbc_3.0\enu\sqljdbc4.jar
to C:\apache-tomcat-7.0.11\lib
SQLExpress:
Enable TCP/IP and set IPAll=1433 (make sure TCP Dynamic Ports is blank). Restart SQL Server Service in SQL Server Configuration Manager.
Set SQL Server Authentication to SQL Server and Windows Authentication Mode in SQL Server Management Studio.
Apache Tomcat:
Start Tomcat by executing batch file C:\apache-tomcat-7.0.11\bin\startup.bat
Open web browser and navigate to http://localhost:8080
Create test.jsp page and copy it to C:\apache-tomcat-7.0.11\webapps\ROOT\
JSP Test Page:
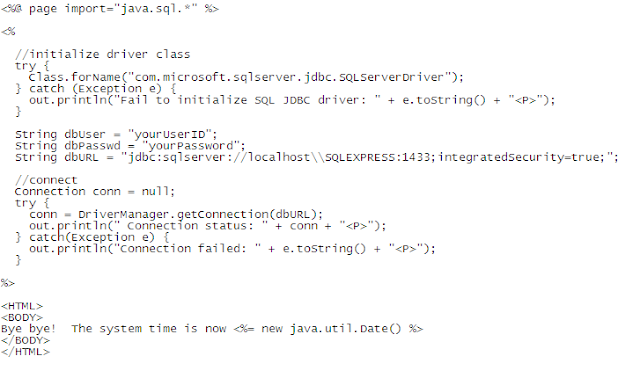
Test Result should be something like this:

This test Tomcat functionality and DB connectivity.
Thursday, February 10, 2011
Moving C:\Users and C:\ProgramData to D:\Users and D:\ProgramData in Windows Server 2008 R2 after Windows is installed
This procedure will free up space on C drive and keep user's data on D drive. It will also create new user profiles on D drive and will not affect current user profiles (now on D drive instead of C drive).
1. Boot into Windows Server 2008 R2 Setup and select "Repair your computer" then select Recovery Tools and then "Command Prompt" from System Recovery Options.
2. When in recovery mode the disk drives end up with different drive letters than what the normally have.
Find your drives: (C or X or virtual/temp Windows drive); (D or E for system drive C); (D or E for D drive)
3. Copy C:\Users and C:\ProgramData to D:\Users and D:\ProgramData
robocopy /mir /xj E:\Users D:\Users
robocopy /mir /xj E:\ProgramData D:\ProgramData
/mir mirror files and security
/xj exclude junction points
4. Remove C:\Users and C:\ProgramData
rmdir /S /Q E:\Users
rmdir /S /Q E:\ProgramData
5. Create juntion points
mklink /J E:\Users D:\Users
mklink /J E:\ProgramData D:\ProgramData
Do not use the /D switch. Using /J, when Windows looks for the C:\Users dir, it will find it! But it will be on the D: drive instead of the C: drive. It will allow access to files within the directory via Windows Explorer and Command Prompt.
6. Verify.
dir e:\
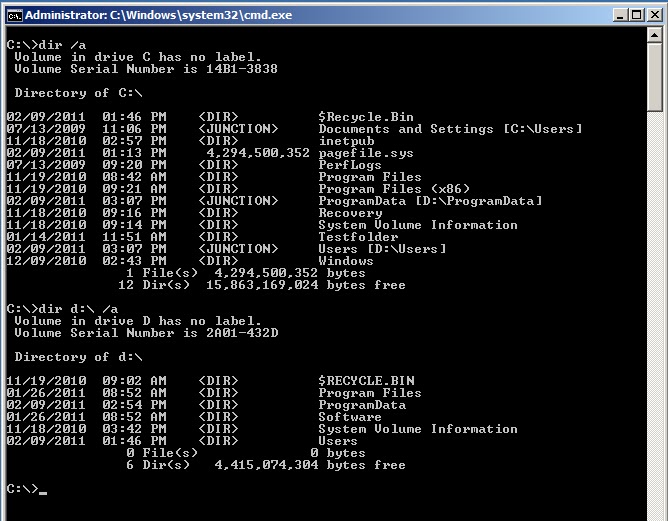
you’ll see: "Users [D:\Users]" and "ProgramData [D:\ProgramData]" on the C: drive.
7. Restart server and log back in to see the changes.
dir c:\ /a
dir d:\ /a

Disclaimer: Althought this worked for me, it's probably not supported by Microsoft as per KB article KB949977
Download: http://www.
The FolderLocations setting specifies the location of the user-profile and program-data folders.
Windows Vista
ProfilesDirectory
Use this setting only in a test environment. If you change the default location of the user-profile directories to any volume other than the system volume, you cannot service your image. Any updates, fixes, or service packs may not be applied to the installation.
ProgramData
Use this setting only in a test environment. If you change the default location of the program-data folders to a volume other than the system volume, you cannot service your image. Any updates, fixes, or service packs may not be applied to the installation.
Windows® 7, Windows Server® 2008 R2, Windows Server 2008
ProfilesDirectory
You can change the default location of user-profile directories to a volume other than the system partition. However, do not move the default location of the user-profile directories to another volume except when deploying to the destination computer during Windows Setup. You cannot capture an image that has a user-profile directory in a nondefault location, because running sysprep /generalize on a Windows image that has user profiles on another volume is not supported.
ProgramData
Use this setting only in a test environment. If you change the default location of the program-data folders to a volume other than the system volume, you cannot service your image. Any updates, fixes, or service packs may not be applied to the installation.
Moving folder locations during deployment using unattended installation from installation media method.
1. Download and install the latest WAIK for Windows 7/Server 2008 R2 from Microsoft.
2. Use Windows System Image Manager WSIM to create the answer file.
a. Create, format and modify partitions using Microsoft-Windows-Setup/Disk Configuration component
b. Specify OS image install location using Microsoft-Windows-Setup/Image Install/OSImage/InstallTo
c. Specify folder locations using Microsoft-Windows-Shell-Setup/FolderLocations
d. Validate, and save file as AutoUnattend.xml
3. Copy AutoUnattend.xml file to removable media (USB flash drive, floppy disk or image)
4. Boot system to be deployed up from DVD media or ISO image and make sure removable media (Usb flash drive, floppy disk or image) is inserted so setup can find the autounattend.xml file and use it for unattended installation.
References:
http://www.windowsnetworking.com/articles_tutorials/Deploying-Vista-Understanding-Windows-AIK.html
1. Boot into Windows Server 2008 R2 Setup and select "Repair your computer" then select Recovery Tools and then "Command Prompt" from System Recovery Options.
2. When in recovery mode the disk drives end up with different drive letters than what the normally have.
Find your drives: (C or X or virtual/temp Windows drive); (D or E for system drive C); (D or E for D drive)
3. Copy C:\Users and C:\ProgramData to D:\Users and D:\ProgramData
robocopy /mir /xj E:\Users D:\Users
robocopy /mir /xj E:\ProgramData D:\ProgramData
/mir mirror files and security
/xj exclude junction points
4. Remove C:\Users and C:\ProgramData
rmdir /S /Q E:\Users
rmdir /S /Q E:\ProgramData
5. Create juntion points
mklink /J E:\Users D:\Users
mklink /J E:\ProgramData D:\ProgramData
Do not use the /D switch. Using /J, when Windows looks for the C:\Users dir, it will find it! But it will be on the D: drive instead of the C: drive. It will allow access to files within the directory via Windows Explorer and Command Prompt.
6. Verify.
dir e:\
you’ll see: "Users [D:\Users]" and "ProgramData [D:\ProgramData]" on the C: drive.
7. Restart server and log back in to see the changes.
dir c:\ /a
dir d:\ /a
Disclaimer: Althought this worked for me, it's probably not supported by Microsoft as per KB article KB949977
Windows Automated Installation Kit for Windows 7 documentation (May 2010 Update)
Unattended Windows Setup Reference for Windows 7 CHM
Windows Vista
ProfilesDirectory
Use this setting only in a test environment. If you change the default location of the user-profile directories to any volume other than the system volume, you cannot service your image. Any updates, fixes, or service packs may not be applied to the installation.
ProgramData
Use this setting only in a test environment. If you change the default location of the program-data folders to a volume other than the system volume, you cannot service your image. Any updates, fixes, or service packs may not be applied to the installation.
Windows® 7, Windows Server® 2008 R2, Windows Server 2008
ProfilesDirectory
You can change the default location of user-profile directories to a volume other than the system partition. However, do not move the default location of the user-profile directories to another volume except when deploying to the destination computer during Windows Setup. You cannot capture an image that has a user-profile directory in a nondefault location, because running sysprep /generalize on a Windows image that has user profiles on another volume is not supported.
ProgramData
Use this setting only in a test environment. If you change the default location of the program-data folders to a volume other than the system volume, you cannot service your image. Any updates, fixes, or service packs may not be applied to the installation.
Moving folder locations during deployment using unattended installation from installation media method.
1. Download and install the latest WAIK for Windows 7/Server 2008 R2 from Microsoft.
2. Use Windows System Image Manager WSIM to create the answer file.
a. Create, format and modify partitions using Microsoft-Windows-Setup/Disk Configuration component
b. Specify OS image install location using Microsoft-Windows-Setup/Image Install/OSImage/InstallTo
c. Specify folder locations using Microsoft-Windows-Shell-Setup/FolderLocations
d. Validate, and save file as AutoUnattend.xml
3. Copy AutoUnattend.xml file to removable media (USB flash drive, floppy disk or image)
4. Boot system to be deployed up from DVD media or ISO image and make sure removable media (Usb flash drive, floppy disk or image) is inserted so setup can find the autounattend.xml file and use it for unattended installation.
References:
http://www.windowsnetworking.com/articles_tutorials/Deploying-Vista-Understanding-Windows-AIK.html
Subscribe to:
Posts (Atom)